|
|
|
|
|
How do I create a category?
|
Go to your "Categories" area of your E-commerce module, and click add.
The path looks like this: YourDomain.com > Modules > Ecommerce: Products (mX) > Categories
See screenshot:

The area looks like this:

Click on "Add Category" to create a new category.
Once you have 1 Category created you can "export to CSV" and create your Categories in a CSV file, then import them. This is recommended if you have a large number of Categories. Also you can Backup your Categories by exporting to CSV and saving the file on your Computer.
When you are on the add category screen you will be able to set the category name, whether its active, make a description for the category, add a picture that represents the category, Select where in the tree structure it appears and set any shipping restrictions. You can also add products that will be included in this category.
See screenshot:

Notes:
- It is recommended to create your Category structure prior to adding products. It is the organizational unit of your products.
- If you have a "category tree" displaying on your site anywhere, all of your active categories will automatically display in the category tree.
- Changes made to your E-commerce module don't need to be published they are live and active once saved.
- If you add an image to your category, you can display them with the advanced Category list frame in a very professional manner.
|
|
|
|
|
|
|
|
|
|
Some of my pages look great on my regular site, but are hard to read on the mobile site. Can I change the layout?
|
YES! You can change each page to have a custom layout for your mobile site. Or they can have the automatic layout. Here is how to make changes:
FIRST
Go to the page that you want to appear different on your mobile site. Click on the "Mobile Version".
See screenshot:

Then you can choose to edit this page manually.
see screenshot:

SECOND
Click on Save and start editing your page for your mobile site.
This will start a blank page for your mobile version. You can copy and paste content from your regular page to your mobile page. This will not interfere with the current page that you have laid out for your desktop/regular page. |
|
|
|
|
|
|
|
|
|
How do I export Products? Export via CSV, Export Inventory, Advanced Export, and Google Merchant Center Export all explained here...
|
You can export products in your "Products" area in your E-Commerce Module.
"Export to CSV"
"Export Inventory"
"Advanced Export to CSV"
"Export to Google Merchant Center"
See screenshot:

When you are on your products page you can export products in a couple of ways.

"Export to CSV"
"Export Inventory"
"Advanced Export to CSV"
"Export to Google Merchant Center"
First thing to understand about this process is if you do a search on the left hand side of this area, and then click any of the export options it will only export the items from the search results. If you wish to export all of your items then you should click the "Show All" button prior to doing an export.
Export to CSV
Will export all of the products listed from the search. It will include all fields that you have for your products. (Fields are "SKU", "Description", "Price", etc...)
Export Inventory
Will export all of the QOH for the results listed. ( it will show the sku and QOH of that sku)
Advanced Export to CSV
This option will export all of the items shown from the search. But will allow you to choose what fields to export. (This can come in handy if you are only looking to update pricing for example. Then you may only want to export the title or sku, and the price field. To keep the file small and easier to update)
See screenshot:

Export to Google Merchant Center
also see this video
This option allows you to export to Google Merchant Center. And set the mapped fields here. This will save a .txt file that you can import to Google Merchant Center. (Note: be sure the fields match how you want them to be linked in Google Merchant Center)
See screenshot:

Once you click on "Export" in any of these scenario's it will either prompt you to save the file (if it is small enough) or it will go to "scheduled tasks" and create the file for you there. Once completed it will have a link for you to click and downlaod your file. The link will expire soon after creation.
|
|
|
|
|
|
|
|
|
|
I have a large site menu on my regular site, is there a way I can make a smaller simpler site menu for my mobile site?
|
YES! you can make a site menu complete separate from your regular site menu. And they will not interfere with each other. Here's how:
FIRST
Enable the ability for a separate mobile site here:
YourDomain.com > Mobile Version Settings
See screenshot:

SECOND
Go to your Site menu area: YourDomain.com > Site Menu
See Screenshot:

Now you will have a drop down here that will allow you to select which version of your site menu you are working on.
By default it will look exactly like your Desktop mobile version. You can add and remove the site menu items without it actually removing any pages. This is just adding a link in your site menu to a page. |
|
|
|
|
|
|
|
|
|
I don't see my header on the mobile site, how do I add it?
|
The regular site header is not automatically shared to the mobile site, but you can specify a header just for your mobile site.
The reason the main site header isn't automatically shared is becuase in most cases it would be too large for a mobile site. It is best to make the header for your mobile site simple. Perhaps your company logo and a slogan.
You can make the mobile site header and footer here: YourDomain.com > Mobile Version Settings
Once in this area you will see an area to add your mobile header and footer.
See screenshot

Notice the editor here is a little more limited. You do not have the copy frame to clipboard option or paste. If you wish to copy content from another page I recommend copying the source and pasting here in source view.
You can also opt to not show the site menu at all for the mobile site. (by checking the "Don't Show Site Menu" check box)
Also you can enable a separate site menu for your mobile site. (by checking the "Separate Site Menu
for Mobile Version")
(NOTE: if you wish to have a link to the full site, you can link some text to a URL like this:http://www.YourDomain.com/home?mobileVersion=off ) (this links to an alias of "home") |
|
|
|
|
|
|
|
|
|
Can I update or add products in mass?
|
YES! this can be done by importing products.
There are several advantages to importing products, 1 is that it is much faster when you have a large number of products you are working on at once. Another, is that the import product option is fairly flexible. You can update, add and remove products with an import.
WE STRONGLY RECOMMEND EXPORTING ALL PRODUCTS AND SAVING AN UNTOUCHED VERSION OF THE FILE BEFORE MAKING ANY MASS PRODUCT CHANGES. This is for backup purposes. Keep in mind we do back up your products, there is a restore fee when we need to pull the backup files and restore them. Keeping a copy of all of your exported files is a free way for you to keep a backup of your products.
To see a list of videos regarding imports click here
To import your products you will first need to format a csv spreadsheet so that our system will recognize your products. The easiest way to do that is to export your current products first and view the exported file. (if you do not have any products yet, it would be easiest to enter in one product manually then export it, so the format is already done for you when going to add more items) Click here to learn how to export products.
Once you have your file created and ready for import you will want to go to the "Import Products" area of your E-commerce Module.
see screenshot:

Once there you will see a screen that looks like this:

You can browse to your file in the first line where it says "text file to import". Click the "browse" button.
Next click on the green "parse first line" button.
Once the file is parsed successfully it will look something like this:

You will want to be sure the fields match. Active should show Active in the drop down list. NOTE you may have fields that you wish to skip during import. If you cilck the drop down list you can choose to skip those fields.
Once the fields are properly mapped you can scroll down the page toward the bottom. It should look like this:

You will want to determine what type of import you are doing. If you are adding new products that do not exist choose "Add". If you are updating certain fields of existing products click "update". If you are removing products you can choose "delete".
You can choose to delete all products before import. I only recommend this if you have a full backup copy of your products and are sure this is what you wish to do. This means that it will delete your entire products catalog and add only what is in your import file.
You can also choose to delete all Categories before import. Again, I only recommend this if you are sure you only want the categories listed that are in your import file and you are "Adding" products.
Don't import First line of file. Always check this. The first line of the file is the header of the file and you do not need to import it.
Default Category. If no category is specified in the file, this category will be used to import your products.
Image Folder. If you choose to upload images with your import you can specify what folder you wish to upload them to.
ZIP File with Images. If you have images to upload and have specified them in your import, then you can upload the corresponding image files in a zip file here.
Finally, click on "Start Import".
Depending on how many products you are importing it may take a while. IF so, the status of the import will be in "Scheduled Tasks".
s |
|
|
|
|
|
|
|
|
|
How can I add a new product?
|
There are a couple ways to add a new product. This answer will show you how to add a new product in your members area by clicking the "add product" button.
for videos relating to adding products see here
1. Once you login to your WF Members area go to "products". This is located under your domain name, Modules, E-commerce Module.
YourDomain.com > Modules > Ecommerce: Products (mX) > Products
Once in your products area, you will see products (if you have any) displayed on the right side of the page.

2.CLICK ON "ADD PRODUCT"
You can add products by clicking the green "add products to" button. If you have Product types defined then there will be a drop down box with your product types, so you can select what Product Type to add the product to. More info about product typs here
Next you will see the screen where you can add information about your product. YOU ONLY NEED TO ADD INFO TO THE REQUIRED FIELDS
See screenshot:

3. FILL IN THE REQUIRED INFO. (See details below on all items listed in this area)
Product type
|
If you wish to choose your product type other than the one selected you can do so here. |
Categories
|
You can select your category.
|
Active
|
check the check box if you wish to make this product active. (NOTE: upon saving this product if your site is live the product will show if your products page is set to display all items) |
QOH-LT-HT
|
If you have "Inventory Control " turned on you will have the option to specify QOH, LT, HT (Quantity on Hand, Low threshold, High threshold)
|
SKU
|
This field must be unique for each item and can have letters or numbers combined
|
Name
|
This it the place where you name your item. This is shown to the customer by default
|
Image
|
This is where you can add images for your product. You can add as many images as you wish. (note: you will need to customize the layout builder to show multiple images)
|
Description
|
This is the description of your product. This is what is shown as a description by default on the product details pages, and this is what Search engines will look at to see what kind of items you have on your site. It is recommeneded to make this area as descriptive and accurate as possible.
|
| Retail Price |
This is the pricing field by default that will show for your product (NOTE: you can have multiple prices for your products, you can add more pricing fields in the "Product Types and fields" area.)
|
Order QTY(S)
|
Field is where you can set the mininum order qty for this product |
| Suggested Products |
You can suggest related items to this item this is where you set what items are similar to this item (NOTE: you will need to add the "Suggested Products" field to the layout builder to show these items) |
| Included Products |
If the product you are adding has items that it includes, then you can specify them here |
The Second portion of the add products screen:

Page Title
|
This is what is seen as the "Title" for the search engines. When it is set to automatic it uses the title of the product and sku
|
|
Page Alias
|
|
|
Meta Description
|
The is where you can edit the meta description for this items product details. When set to automatic, it will use info from the description field
|
|
Meta Keywords
|
This is where you can edit the meta keywords. by default it uses the "name" field to populate it
|
|
Product Options
|
This is where you can add options for your product. for example if you are selling a shirt a product option would be sizes or colors. (Note a global option can be applied to multiple products, a product specific option is available for only that product)
|
|
Product Level Discounts
|
This is where you can enable product level discounts. If you wish to have a discount for this product you can click this box. Once clicked you will have the option to make discounts based on Qty or cost. And have the option to give it a new price, a percentage discount or a set price discount.
|
 |
Ship From
|
The shipping location are setup in the "Shipping sources" area of the E-commerce Module
|
|
Shipping Restriction
|
This is one place where you can specify if this item ships nationally, internationally or has no shipping restriction
|
|
4. Once finished click Save.
|
|
|
|
|
|
|
|
|
|
What can I change in the "My Profile" area?
|
Here you will find what you can change and how it affects your site in the "my profile" area.
In your "my profile" area you can change:
- Password (for your websiteforge Members area login)
- Name (for the owner/contact of the account)
- Last name
- Email (this is used for us to contact you, as well as system notifications will be sent to this address. you can also have your feedback forms or modules email this account where the settings say "email from my profile")
- Country
- State
- City
- Address
- Zip
- Company name (this is for our records)
- Phone number (this is how we can contact you)
See screenshot below:

|
|
|
|
|
|
|
|
|
|
What are the Icons on the Content toolbar in Internet Explorer?
|
Here you will find a breakdown of all of the content Toolbar icons. The Toolbar looks slightly different in Internet Explorer then it does in Firefox. This example will break down the Internet Explorer Content Toolbar.
(Click Here for Firefox content toolbar breakdown)
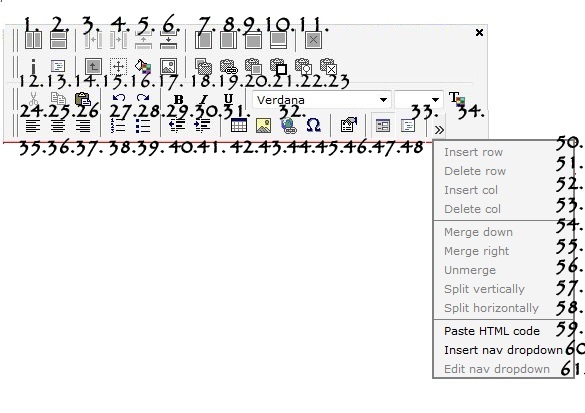
| Button Title |
Button Function |
Button Title |
Button Function |
| 1. Split frame Vertically |
This will "add" another frame to the right of the current selected frame |
32. Font Name |
This will allow you to select from the loaded fonts
|
| 2. Split frame Horizontally |
This will "add" another frame above the selected frame |
33. Font Size |
This will allow you to change the size of the font. For either selected text or text from the cursor point forward. |
| 3. Move Frame left |
This will move the selected frame left one position |
34. Font Color |
This will allow you to alter the color of the font. Either selected text or text from the cursor point forward.
|
| 4. Move Frame Right |
This will move the selected frame right one position |
35. Left Align |
This will allow you to left align your text or content.
|
| 5. Move Frame Up |
This will move the selected frame up one level |
36. Center Align |
This will allow you to center your text or content.
|
| 6. Move Frame Down |
This will move the selected frame down one level |
37. Right Align |
This will allow you to right align your text or content. |
| 7. Add Leftmost column |
This will add a left most column. If you have several split frames on your page it can be nice to have a left most frame so that it spans the whole page |
38. Insert Number List |
This will insert or remove a number list.
|
| 8. Add Rightmost Column |
This will add a right most column. If you have several split frames on your page it can be nice to have a right most frame so that it spans the whole page |
39. Insert Bullet List |
This will insert or remove a bulleted list. |
| 9. Add Topmost Column |
This will add a top most column. If you have several split frames on your page it can be nice to have a most frame so that it spans the whole width of the page |
40. Decrease Indent |
This will decrease an indent.
|
| 10. Add Bottommost Column |
This will add a Bottom most column. If you have several split frames on your page it can be nice to have a Bottom most frame so that it spans the whole width of the page |
41. Increase Indent |
This will add an indent or increase it in size. |
| 11. Delete Frame |
This will completely remove the frame and all containing data in the selcted frame |
42. Insert Table |
This will insert a table.
|
| 12. Frame Type and Info |
This will allow you to change the type of frame that you are using on the page |
43. Insert Image |
This will allow you to insert and uploaded image. (and will have a link for you to upload an image) |
| 13. Frame Content |
This will take you to the settings of the selected frame |
44. Insert Link |
This will allow you to link selected text or images to another page, a product, a module category, a module item, a mailto link, a file, and an external URL
|
| 14. Select Parent Cell |
This will allow you to select your current frame and the parent frame(frame above) to make changes such as background color for both frames |
45. Insert Symbol |
This will insert one of the listed symbols (like: ®,©, ¢ etc...) |
| 15. Frame Borders and Margins |
Frame borders and margins is used to create a border color around a frame or can be used to adjust spacing in your frame. |
46. Properties |
This will allow you to see the properties of a selected item.
|
| 16. Frame Background Color |
Frame background color allows you to specify a color for the background of the selected frame |
47. HTML View |
This will show you the HTML view
|
| 17. Frame Background Image |
Frame background image allows you to set and image as your frame background. Also note that you can move your frame background image with adjusting the frame borders under "Frame borders and margins" |
48. Source View |
This will show you the Source view(source code)
|
| 18. Copy frame Content to Frame Clipboard |
Copy Frame content to frame clipboard allows you to copy the contents of the frame so that you can paste them to another page or another frame on the same page (if desired) |
49. Arrows to see MORE options
|
Click arrows to see more options
|
| 19. Share Frame Content (Copy from frame clipboard BY REFERENCE) |
Share Frame Content (Copy from frame clipboard BY REFERENCE) will paste the copied frame contents and Share them with another page. This means that if you make any content changes to either frame they will reflect the same content |
50. Insert Row
|
This will insert a row into a table
|
| 20. Clone Frame Content (Copy from frame clipboard BY VALUE) |
Clone Frame Content (Copy from frame clipboard BY VALUE) this will allow you to paste content of a frame to another frame but the content will be seperate. Meaning that when one frame's data is changed the two frames will be different. You can also use this option to "un-share" content with a frame that was previously shared |
51. Delete Row
|
This will remove a row from a table
|
| 21. Paste format from frame clipboard |
Paste Format will paste formatting such as font size or color or background color to another frame without changing the content of the new frame |
52. Insert Column
|
This will insert a column to a table
|
| 22. view frame clipboard |
View frame clipboard opens a pop up window and shows you what you have put in your frame clipboard |
53. Delete Column
|
This will Delete a column from a table
|
| 23. Clear frame clip board |
Clear frame clipboard does that...empties the clipboard. |
54. Merge Down
|
This will merge cells down in a table
|
| 24. Cut |
This will remove selected text or item and place it on the clipboard. |
55. Merge Right |
This will merge cells right in a table
|
| 25. Copy |
This will copy the selected text or item and place it on the clipboard. |
56. Unmerge
|
This will unmerge cells in a table
|
| 26. Paste |
This will Paste the content of the clipboard to the area where the cursor resides. |
57. Split Vertically
|
This will split a frame vertically
|
| 27. Undo |
Undo, will undo up to the last 14 commands |
58. Split Horizontally |
This will split a frame horizontally
|
| 28. Redo |
Redo, will redo up to the last 14 commands |
59. Paste HTML Code
|
This will allow you to paste HTML code to your page
|
| 29. Bold |
This will make your selected text or text from the cursor point forward bolded |
60. Insert Nav Dropdown
|
This will allow you to insert a navigation drop down. Like this:
|
| 30. Italic |
This will Italicize your selected text or text from the cursor point forward. |
61. Edit Nav Dropdown
|
|
| 31. Underline |
This will Underline your selected text or the text from the cursor point forward. |
|
|
|
|
|
|
|
|
|
|
|
|
What are the Icons on the Content toolbar in the Editor?
|
This is the definition breakdown of the content toolbar in the editor.

| Button Title |
Button Function
|
1. Cut
|
This will remove selected text or item and place it on the clipboard.
|
2. Copy
|
This will copy the selected text or item and place it on the clipboard.
|
3. Paste
|
This will Paste the content of the clipboard to the area where the cursor resides.
|
4. Paste as plain text
|
This will paste any formatted content on the clipboard without formatting.
|
5. Paste from Word
|
This will paste copied text from word. (Note if pasting content from word without using this option, word will add a lot of uneeded code to your page and can cause conflicts in some scenarios. if pasting from word it is best to use this option)
|
6. Undo
|
undo, will undo up to the last 14 commands
|
7. Redo
|
Redo, will redo up to the last 14 commands
|
8. Bold
|
This will make your selected text or text from the cursor point forward bolded
|
9. Italic
|
This will Italicize your selected text or text from the cursor point forward.
|
10. Underline
|
This will Underline your selected text or the text from the cursor point forward.
|
11. Remove Format
|
This will take any formatting off the page. (like bolding, Underlines etc...)
|
12. Font Selector
|
This will allow you to select from the loaded fonts
|
13. Font Size Selector
|
This will allow you to change the size of the font. For either selected text or text from the cursor point forward.
|
14. Font Color Selector
|
This will allow you to alter the color of the font. Either selected text or text from the cursor point forward.
|
15. Left Align
|
This will allow you to left align your text or content.
|
16. Center Align
|
This will allow you to center your text or content.
|
17. Right align
|
This will allow you to right align your text or content.
|
18. Justify
|
This will allow you to justify your text or content.
|
19. Subscript
|
A subscript or superscript is a number, figure, symbol, or indicator that appears smaller than the normal line of type and is set slightly below or above it – subscripts appear at or below the baseline, while superscripts are above. Subscripts and superscripts are perhaps best known for their use in formulas, mathematical expressions, and descriptions of chemical compounds or isotopes, but have many other uses as well. For example, the formula for glucose is C6H12O6 |
20. Superscript
|
21. Insert/Remove Number list
|
This will insert or remove a number list.
|
22. Insert/Remove Bullet list
|
This will insert or remove a bulleted list.
|
23. Decrease Indent
|
This will decrease an indent.
|
24. Increase Indent
|
This will add an indent or increase it in size.
|
25. Insert Table
|
This will insert a table.
|
26. Insert Image
|
This will allow you to insert and uploaded image. (and will have a link for you to upload an image)
|
27. Insert Symbol
|
This will insert one of the listed symbols (like: ®,©, ¢ etc...)
|
28. Insert Link
|
This will allow you to link selected text or images to another page, a product, a module category, a module item, a mailto link, a file, and an external URL
|
29. Insert Navigation Drop Down
|
This will allow you to insert a navigation drop down. Like this:
|
30. Maximize Editor
|
This will allow you to make an editor full screen.
|
31. View Source
|
This will allow you to view the source. You can edit and update your page in source view if you are familiar with HTML.
|
|
|
|
|
|
|
|
|
|
|
How can I allow users to "Google +" specific products or items?
|
You can allow users to "Google +" a specific item or product by adding the "social button" option in your layout builder.
EVERY page that has an item/product list frame has a layout builder. First you should determine where you want to display your "Google +" button. (whether its on the Item/Product page or Item/Product details page.
When you are in your layout builder you may want to make some columns for the social buttons to keep them together and neat.
In this example I have added 4 columns. (3 for my buttons and 1 to use up the extra space so the buttons are together)
In the Second column I am going to put the "Google +" button. to do this you need to go to the column or space you wish to add it and then click the "+" button and select "social button".
see screenshot:

Once you click on the "Social Button" option you will have a screen pop up with options for what type of social button you wish to display.
see screenshot:

In this example I wish to add the "Google +" button. You will see an example of how it will look as you change options in the bottom window.
Click apply.
Then be sure to Save your layout. and preview.
|
|
|
|
|
|
|
|
|
|
How can I allow users to "PIN IT" specific products or items?
|
You can allow users to Pin a specific item or product by adding the "social button" option in your layout builder.
EVERY page that has an item/product list frame has a layout builder. First you should determine where you want to display your "PIN IT" button. (whether its on the Item/Product page or Item/Product details page.
When you are in your layout builder you may want to make some columns for the social buttons to keep them together and neat.
In this example I have added 4 columns. (3 for my buttons and 1 to use up the extra space so the buttons are together)
In the Second column I am going to put the "PIN IT" button. to do this you need to go to the column or space you wish to add it and then click the "+" button and select "social button".
see screenshot:

Once you click on the "Social Button" option you will have a screen pop up with options for what type of social button you wish to display.
see screenshot:

In this example I wish to add the "Pin It" button. You will see an example of how it will look as you change options in the bottom window.
Click apply.
Then be sure to Save your layout. and preview.
|
|
|
|
|
|
|
|
|
|
How can I allow users to "like" specific products or items?
|
You can allow users to like a specific item or product by adding the "social button" option in your layout builder.
EVERY page that has an item/product list frame has a layout builder. First you should determine where you want to display your like button. (whether its on the Item/Product page or Item/Product details page.
When you are in your layout builder you may want to make some columns for the social buttons to keep them together and neat.
In this example I have added 4 columns. (3 for my buttons and 1 to use up the extra space so the buttons are together)
In the first column I am going to put the Facebook like button. to do this you need to go to the column or space you wish to add it and then click the "+" button and select "social button".
see screenshot:

Once you click on the "Social Button" option you will have a screen pop up with options for what type of social button you wish to display.
see screenshot:

In this example I wish to add the "like" button, include the "send" button, and have the layout with the button and counter horizontal. You will see an example of how it will look as you change options in the bottom window.
Click apply.
Then be sure to Save your layout. and preview.
|
|
|
|
|
|
|
|
|
|
What is a FAQ frame type?
|
The FAQ frame type allows you to have a list of questions on your page that link to answers on your page.
Here is how you setup the frame. First change the frame type to an FAQ frame type.
This can be done by clicking on the frame you wish to make the FAQ frame and then clicking the "change frame type" icon on the toolbar.
See screenshot:

Next you will choose "basic frames" and then "FAQ" frame type.
See screenshot:

Click save. Once you click save it will direct you to the "Frame settings" for the FAQ frame.
Now you can click on "add Q&A".
see screenshot:

Once you click on "add Q&A" 2 boxes will appear allowing you to add a question and answer. In some browsers you may need to click on "edit text" to add your questions and answers to the text area.
see screenshot:

Click Save.
You can add as many questions and answers as you like.
Some have used this frame type to list testimonials from their customers. If you wish to use the frame for something other than questions, you can change the label at the top to reflect the appropriate use. (if you wish to have the back label say "back to testimonials" then you can edit the label at the top of this page.
|
|
|
|
|
|
|
|
|
|
How can I add a frame to my page?
|
Splitting a frame will add a frame to your page.
You can add a frame to your page in 2 ways.
1. Split a frame (will be explained below or see Video on how to do this)
2. Add a topmost, Sidemost, or Bottomost frame. You can do this by clicking the option for that on the content toolbar.(click here to see a video on adding these frames) Click here to see where on the Content toolbar those options are located.
To split a frame click on the frame you wish to split, then determine if you want it split horizontally or Vertically.
See screenshot for how to split a frame Vertically:

The above Screenshot will add a new frame to the right of the selected frame with the pinterest button in it.
See below for how to split the frame Horizontally:

This will add a new empty frame above the selected frame with Pinterest button in it. |
|
|
|
|
|
|
|
|
|
What is the Facebook Widget and how do I configure it?
|
The Facebook Widget allows you to add different Facebook integrations into your website.
To add the Facebook Widget to your page you will first need to add the frame to your page.
Select "basic frames".

Once you select the module from the first drop down you will want to choose the frame type for that module.
In Frame Types, you will need to select "Facebook Widget".

| FaceBook Widget |
This feature allows you to put different facebook options on your page. This will allow people to Like, send, follow, comment, See Activity Feeds, Recommend, See Recommended, Like Box, Login, Registration, Facepile. for detailed information about how each of these works please read more below.
|
Here are the different features of the widget:
The Like button lets users share pages from your site back to their Facebook profile with one click.
see screenshot:

The Send button allows your users to easily send your content to their friends.
See screenshot:

The Follow button allows people to subscribe to other Facebook users directly from your site. (This used to be called the Subscribe Button.)
See screenshot:

The Comments plugin lets users comment on any piece of content on your site.
See Screenshot:

The Activity Feed plugin shows users what their friends are doing on your site through likes and comments.
See screenshot:

The Recommendations plugin gives users personalized suggestions for pages on your site they might like.
See Screenshot:

The Like Box enables users to like your Facebook Page and view its stream directly from your website.
See screenshot:


The Facepile plugin displays the Facebook profile pictures of users who have liked your page or have signed up for your site.
See Screenshot:

|
|
|
|
|
|
|
|
|
|
How do I change a Frame Type? (info on all frame types from social media to ecommerce shopping cart frames)
|
You can Change a frame type at any time. **Caution you can lose data in a frame when changing frame types**
This Answer will cover different frame types and will link to how to use them.
When you're frame is selected you will see a small "i" icon.
see screenshot:

When clicking on this icon you will have options on changing your frame to a frame type other than what it is currently set to.
Once you click the "i" icon you will see two drop downs. The list of what is in the drop downs will depend on the website package you have.
Under the "module" drop down there can be:
See screenshot:
**NOTE: In this example there are multiple membership modules. THIS IS IMPORTANT. When you are selecting something like a login panel, it does matter which membership module you choose. Each Membership module will need a login panel on the site in order for it to be used.
Once you select the module from the first drop down you will want to choose the frame type for that module.
Under the "Basic Frames" module there are these Frame types:
Return to Top
see screenshot:

| Rich Text |
This Frame is the default frame type you use for entering text. |
| FAQ |
This will allow you to create an FAQ area with a section of questions that link to answers further down the page. See more info here
|
| Feedback Form |
This is often used for a Contact us form, but can be customized to be used for Survey's or anything you may wish to collect information for. |
| Media Player |
This Frame type allows you to put a video or music player on your page. it will play mp4, mp3, flv, swf, mov, avi, wmv. When you upload an unsupported file type the uploader will convert your file to a supported format. See Video here
|
| Custom Script |
This Frame Type will allow you to do several things with a custom script. Including redirecting to an external URL. Running and external URL within the site. It is also used when our team creates a custom script for your site. |
| Image Gallery |
This feature will allow you to make a list of your images and is configurable to display a custom number of rows and columns. And can show a specific number of images if desired. |
| Image Folders |
This feature works similar to a Category list. It will list the folders that your images are stored in. and can be customized as well. |
| Button |
This feature allows you to create a generic button that can "go back", go to a "site page" or an "external URL" |
| WF Login Panel |
This is a frame that will allow you to login to your WF Members area. If you want to have a "webmaster login" on one of your pages for sub account users you can do it with this. |
| Signature Confirmation |
This will take a digital signature. If you wish to collect a signature on a page for any particular reason it can be added with this frame. A digital signature is legally binding. |
| Navigation Menu |
This feature is very flexible. You can create a custom menu linked to site pages, aliases, Module items, Module Categories, External URL's. and can have custom buttons. (you can create an image of a button and use it, or try some of the pre-made layouts) See Video here
|
| FaceBook Widget |
This feature allows you to put different facebook options on your page. This will allow people to Like, send, follow, comment, See Activity Feeds, Recommend, See Recommended, Like Box, Login, Registration, Facepile. for detailed information about how each of these works please see more here. |
| Google +1 Button |
This button allows users to "+1" your page. (whatever page it is put on) See Video here
|
| Pinterest Widget |
This button allows users to pin your page. (whatever page you put it on) |
| Slide Deck |
This feature allows you to create a slide show of images or text. It can be linked to products, pages, Categories, Module items, or external URL's. See Video here
|
| Full Text Search Box |
This feature allows you to have a search box that will search any specified area of your site. (you can specify what areas in the YourDomain.com> Full Text Search Settings area. This frame type requires a Basic / search results frame to display the results. AND it can search content pages and all modules. |
| Full Text Search Results |
This Frame type will display the results of your search box. They both need to be put on your site for them to work properly. (they do not need to be on the same page, but do both need to be on the site) |
Under the "AD" Module there are these frame types:
Return to Top
For all videos pertaining to the AD module click here
See Screenshot:

Location List
|
This frame type will show a list of your locations and is customizable. |
| Advanced Location List |
This Frame type is similar to the Location List, but has more options for customization. Like recently visited locations, current location information, and has a layout builder to further allow customization. |
| Location Title |
This will show the Title of your locations (as filled out in your Location) |
| Location Description |
This will display the Location Description (as filled out in the description field of your Location) |
| Full Text Search Box |
The module specific "full text" search boxes only return results from that module and they use the module's normal "list" frame(s) to display results
|
Item List
|
This frame is used to display your items, and can be used as a search results frame when the frame is set as "search results" in the frame settings.
|
Member's Message Box
|
To enable this functionality, attach a feedback module under System Settings of this place ad one.
|
Item Reviews
|
This frame type will display reviews that have been left, this is usually added to the item details page.
|
Review This Item
|
This frame is used to allow users to review an item. This is also most often used on the items details page. Click here for a quick video on this.
|
Under the "Advanced Gallery" Module there are these frame types:
Return to Top
For a list of videos pertaining to the advanced gallery module click here

Category List
|
This frame type will list all of the selected Categories
|
Advanced Category List
|
This frame will allow you to customize the layout of the Categories listed
|
Category Title
|
This frame will show the Category title. (as filled out in the module)
|
Category Description
|
This frame will show the Description field as it is filled out in the module.
|
Search Box
|
This will add a search box for this module specifically
|
Image List
|
This will add an image list. (images for this list are put in to the module and information is filled out in the module)
|
Under the "Blog" Module there are these frame types:
For a list of videos pertaining to the Blog Module click here
see screenshot:
Return to Top

Posts
|
This frame will show the posts that you have created in your module. (or if you allow it posts made by logged in authors)
|
Search Box
|
This frame will make a search box for your posts
|
Calendar
|
This frame will have a calendar and the dates will be clickable on the days there was a post made
|
| Category List |
This frame will show a list of all of your categories. |
Under the "Ecommerce" Module there are these frame types:
for a list of videos pertaining to the E-commerce module click here
See screenshot:
Return to Top

Category List
|
This frame will show selected Categories in a list.
|
Advanced Category List
|
This option allows a customized layout for your category list including the option to display category images that link to the categories
|
Category Title
|
This frame will show the title of your category that is specified in the Module
|
Category Description
|
This frame will show the Category description that is specified in the Module
|
Full Text Search Box
|
This frame will add a search box that searches your e-commerce module. And item list frame set to "search results" is needed to display the results of this search box.
|
Product List
|
Products list will show selected products from your e-commerce module. You can make the selection in the frame settings and customize the layout in the layout builder
|
Signature Confirmation
|
This frame will add a signature confirmation box to any page it is added to. A digital signature is legally binding.
|
Item Reviews
|
This frame will show reviews that have already been made.
|
Review this Item
|
This frame will allow users to review an item. For more info about setting this up see this video
|
Mini Shopping Cart (new)
|
This frame will add a mini shopping cart. see this answer for the differences between full and mini cart
|
Full Shopping Cart (new)
|
This frame will add a full shopping cart.
|
Under the "Membership" Module there are these frame types:
for a list of videos pertaining to the E-commerce module click here
See screenshot:
Return to Top

Login Panel
|
This frame is required for your users to login and access the site with member privileges. |
Add/Edit Profile Form
|
This frame will allow your customers to edit their profile information.(Note this can also be done on the edit profile form page, under YourDomain.com> Pages > Membership: Member Login (m#) > Edit Profile (m#_edit_item.html) > Page Layout ) |
Member List
|
This will allow you to show a specified list of members (you can specify in the frame settings) This option also has a layout builder.
|
Full Text Search Box
|
This will place a search box on your page, that will show results in a Member list frame (when set to search results) and will allow users to search members.
|
Group List
|
This frame will list specified groups on your page. (you can specify them in the frame settings)
|
Group Title
|
This will show the Group's title.
|
Group Description
|
This will display the description of the group, if one is specified in the module's group description field.
|
Chat
|
This feature will allow logged in members to chat with one another
|
Email Opt-out Panel
|
This will add an opt out panel to the page you are working on. If users desire to not get your notifications anymore.
|
Item Reviews
|
This will add an item reviews frame that will display your reviews.
|
Review This Item
|
This will allow users to review a member
|
Mini Sign up Form
|
This is a shortened sign up form and will show a minimal amount of fields. (required fields only)
|
Under the "Store Locator" Module there are these frame types:
for a list of videos pertaining to the E-commerce module click here
See screenshot:
Return to Top

Location List
|
This frame will show a specifed list of your locations. (you can specify them in the frame settings)
|
Advanced Location List
|
This will show a location list and is customizable. This frame also has a layout builder
|
Location Title
|
This will show your location Title (as specified in the module)
|
Location Description
|
This will show your location description (as specified in the module)
|
Location Search Box
|
This will add a search box for your locations.
|
|
|
|
|
|
|
|
|
|
|
What is the Site Menu? And how do I change it?
|
The site menu can be different on each site in its location, but for all sites it is the main menu bar where links to your pages go. You can change this menu in the Yourdomain > Site Menu area.
(Click here to see a video on how to Edit the site menu)
In this answer we will discuss:
on the support site here is the site menu and a navigation menu.(click here to see how to add and edit a navigation frame. Video here)
see screenshot:

When you are in the "Site menu" area you can add and delete menu items and it does not delete any pages.

To add a new Menu Item fill in the "Menu Item Label" field. If you are linking to an alias (which is recommended) then start by clicking the drop down for "link to" and select the alias you wish to link to and it will automatically fill in the "Menu Item Label".
You can choose if this is a main menu item or sub menu item with the "parent" drop down. If it is a main menu item leave it at "top level" if not then choose which item it will be a sub-menu of.
In the "place after" drop down you can choose the placement of your new menu item.
To delete a menu item check the "delete" check box next to the menu item and then click the "delete" button beneath it.
To make a Categorized Sub-Menu, you will first need to determine the structure you wish to use for your items. For example if you sell Jewelry, you may want to make a Header called "Gold Rings", and then have links to your individual gold rings. If you sell a larger number of Items, you may want to make a Header more broad. For example your header may say "Gold Jewelry" and the links under it can be links to categories to your Gold jewelry.
Now you say, "What is a Header?" That is a good question! :)
The Bolded Items that are highlighted in red are "Sub-Menu Headers"

Here is How you create this menu.
Step 1. Create a Main Menu Item (in this example it is "Jewelry")
Step 2. Create Your Sub-Menu Headers (you can add them individually or all at the same time)
Step 3. Add links under your Headers to either pages, Categories, or Items.
Step 1 Image.

Step 2 Image

Step 3 Image

This process functions the SAME for navigation menu's and Site Menu's.
If you have any questions about this process please feel free to contact Support :)
|
|
|
|
|
|
|
|
|
|
How to I add a new page?
|
This answer will show you how to add a new page.
See video instructions on this here
When you are in your Websiteforge Members area, and expand your domain name on the left panel you will see a list of items, among that list you will see "pages". If you expand "Pages" you will see a blue link for "Add page".
See Screenshot:

Next you will be taken to the "page Settings" screen that looks like this:

- You can choose your page group here. (more on page groups here)
- Choose whether the page is active or not. (NOTE: pages that are not active cannot be previewed)
- Next is your "Page name". This is the name you will see in your page list. It is for your personal reference. and is a required field.
- Next is your "page Title" this is the name that will show on the browser tab of your page, and can optionally be shown on the page in the next step. This is also a required field
- Next is the option to show the title on the page or not.
- Next if you have multiple designs for your site you can choose which design you want to apply to this page. Also you can choose to have "No Design" and make your new page without a specific template applied.
- Next is the option to add a Site Menu item, by default adds this new page to the site menu with the "Page Name" that you gave it above. If you wish to add your site menu link to this page later you can choose "Do not add" in the drop down list and add it at any time later in the "Site Menu" area. Or you can change the name of the Site menu link in the next step.
- Next this is the name that will show on your site menu. Click here to see more info on adding a site menu item later
- Next if you wish to have this page acccessed by a single username and password you can specify it here. (If you want to have members access the page please see how to set that up here)

- Next is "Restricted Access" this is what you check if you wish to make this page accessible to members in a group. (For more details on setting this up click here)
- Next is "Secure Page". This is used to secure certain pages on your site. Your merchant or Pci compliance provider may require certain pages to be secured. This is what you check to secure them. (NOTE: by default your checkout pages are already secured)
- Next is "Copy Protection". This will not allow users to copy content from your page. But use this carefully, when this option is checked it will make the page virtually invisible to crawlers and will affect your Search engine ranking for this page
- This next area is for creating a pop up box dimensions and selecting an already created page for your pop up. (NOTE: Be aware most browsers now enable pop up blockers and your site visitors may not see your pop up message.)
- "use for full text search" is for the search box called "full text search" if you want this page to be searched when that box is being used then you would want to check this box
- "Page logo for FB" you can add a logo here that when this page is pasted to facebook it will use that logo for this page.
|
|
|
|
|
|
|
|
|
|
How do I add a Module?
|
You can add and remove Modules depending on your website package that you purchased.
To add a module go to YourDomain.com > Module List
See Screenshot:

Once on this scren click on the green "add Module" button.
you will be taken to a screen that looks like this:

On this screen you can choose from the drop down list what Module you wish to add. This list is limited by the website package you purchased.
If you wish to purchase a module that isn't showing in your drop down list you can purchase add on Modules for existing clients here. Or feel free to contact support |
|
|
|
|


